Search This Blog

Tuesday, June 23, 2015

Logshipping Errors


Error 1:
Logshipping backup job fails at the primary server with the error message below:

Message
2014-10-31 14:36:18.44    *** Error: Backup failed for Server ‘<Server Name>’. (Microsoft.SqlServer.SmoExtended) ***
2014-10-31 14:36:18.45    *** Error: An exception occurred while executing a Transact-SQL statement or batch.(Microsoft.SqlServer.ConnectionInfo) ***
2014-10-31 14:36:18.45    *** Error: BACKUP LOG cannot be performed because there is no current database backup.
BACKUP LOG is terminating abnormally.(.Net SqlClient Data Provider) ***
2014-10-31 14:36:18.50    —– END OF TRANSACTION LOG BACKUP   —–

Solution
This message is thrown because the database is never backed up fully before. Do a full backup of the primary database to solve this issue.

Error 2:

Restore database job at the secondary server failed with the error message below:
Error: The restore operation cannot proceed because the secondary database ‘<Database Name>’ is not in NORECOVERY/STANDBY mode.(Microsoft.SqlServer.Management.LogShipping)
Solution :
Restore the secondary database with the full backup of the primary database with NORECOVERY and REPLACE option. An example is given below:
USE [master]
RESTORE DATABASE [TestLST] FROM  DISK = N'G:\Temp\TestLS.bak' WITH  FILE = 1,
MOVE N'TestLS' TO N'E:\SQLData\TestLS.mdf',
MOVE N'TestLS_log' TO N'H:\SQLLog\TestLS_log.ldf',
NORECOVERY,  NOUNLOAD,  REPLACE,  STATS = 5
GO

Error 3:
After some disk issues at the production server the logshipping continually failed. So I tried a full back up the primary database and restored the secondary database with this full  backup and started the log shipping again. And the logshipping backup of the primary database failed with the error message below:
Message
2014-10-31 13:34:00.33    *** Error: Backup failed for Server ‘<Server Name>’. (Microsoft.SqlServer.SmoExtended) ***
2014-10-31 13:34:00.33    *** Error: An exception occurred while executing a Transact-SQL statement or batch.(Microsoft.SqlServer.ConnectionInfo) ***
2014-10-31 13:34:00.33    *** Error: BACKUP detected corruption in the database log. Check the errorlog for more information.
BACKUP LOG is terminating abnormally.
10 percent processed.
20 percent processed.
30 percent processed.
40 percent processed.
50 percent processed.
60 percent processed.
70 percent processed.
80 percent processed.
Processed 8 pages for database ‘<Database Name>’, file ‘<Database Name>_Data’ on file 1.
Processed 2013584 pages for database ‘<Database Name>’, file ‘<Database Name>_1_Data’ on file 1.
Processed 1380536 pages for database ‘<Database Name>’, file ‘<Database Name>_2_Data’ on file 1.
Processed 1671736 pages for database ‘<Database Name>’, file ‘<Database Name>_3_Data’ on file 1.
90 percent processed.(.Net SqlClient Data Provider) ***
2014-10-31 13:34:00.37    —– END OF TRANSACTION LOG BACKUP   —–
Exit Status: 1 (Error)

Solution:
One of the solutions is to configure the log shipping all over again so the logshipping job will initialize the secondary database.
The other solution is to follow the steps below: (Ref: http://www.sqlskills.com/blogs/paul/how-can-a-log-backup-fail-but-a-full-backup-succeed/)
  1. Stop all user activity in the primary database
  2. Switch to the SIMPLE recovery model (breaking the log backup chain and removing the requirement that the damaged portion of log must be backed up)
  3. Switch to the FULL recovery model
  4. Take a full database backup (thus starting a new log backup chain)
  5. Start the logshipping job
Error 4
Logshipping primary database backup job failed with the following error:
Message
2014-11-03 14:53:02.80    *** Error: Backup failed for Server ‘<Server>’. (Microsoft.SqlServer.SmoExtended) ***
2014-11-03 14:53:02.85    *** Error: An exception occurred while executing a Transact-SQL statement or batch.(Microsoft.SqlServer.ConnectionInfo) ***
2014-11-03 14:53:02.85    *** Error: Cannot open backup device ‘\\<Server>\LogShippingBackups\DatabaseName\DatabaseName_20141103145302.trn’. Operating system error 5(failed to retrieve text for this error. Reason: 15105).
BACKUP LOG is terminating abnormally.(.Net SqlClient Data Provider) ***

Solution
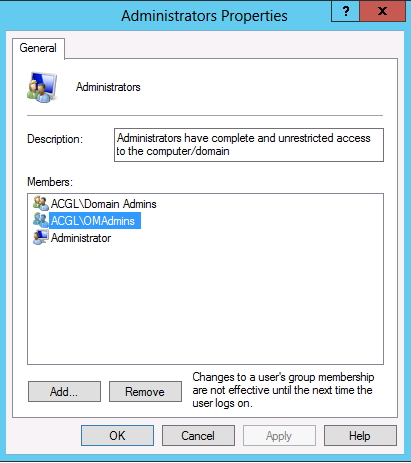
SQL Server agent does not have appropriate permission to access the shared folder. Granting access solves this problem.

Sunday, June 21, 2015

SSIS

Only one instance can be installed per computer

IS is a shared features in the installation


In previous versions of SQL Server (<2012), by default when you installed SQL Server all users in the Users group had access to the Integration Services service.


To grant access to the Integration Services service

1.Run Dcomcnfg.exe. Dcomcnfg.exe provides a user interface for modifying certain settings in the registry.

2.In the Component Services dialog, expand the Component Services > Computers > My Computer > DCOM Config node.

3.Right-click Microsoft SQL Server Integration Services 11.0, and then click Properties.

4.On the Security tab, click Edit in the Launch and Activation Permissions area.

5.Add users and assign appropriate permissions, and then click Ok.

6.Repeat steps 4 - 5 for Access Permissions.

7.Restart SQL Server Management Studio.

8.Restart the Integration Services Service.


Deployment model comparison
 
Feature Package Deployment Project Deployment
Unit of Deployment Package Project
Storage File System or msdb SSIS Catalog
Dynamic Configuration Package configuration Environment variables mapped to project-level parameters and connection managers
Compiled Format Multiple .dtsx files Single .ispac file
Troubleshooting Configure logging for each package SSIS catalog includes built-in reports and views

One noticeable difference in the SSIS project created in SQL Server 2012 is that by default the SSIS project will be created in Project Deployment mode, but if you need to you can change it by right clicking on the project in Solution Explorer and clicking on "Convert to Legacy Deployment Model". 

A SSIS project in Project Deployment model creates a deployment packet (with *.ispac extension) that contains everything (all packages/parameters) needed for deployment unlike the Legacy Deployment mode in which each SSIS package is separate unit of deployment.

The second screen of the wizard is the place where you actually specify the location to deploy from; you can either choose the deployment packet (*.ispac) file or choose an already deployed package from the Integration Services catalog as the source for the deployment. Since I want to deploy from the SSIS project, I have specified the *.ispac deployment packet name:

*Project deployment file
*Integration Services Catalog


In SQL Server 2014 (SSMS), you can roll the project back by selecting version. In the Project Versions dialog box, simply select the older version and click Restore to Selected Version to roll back the entire project to an earlier release.


Project Deployment model
To configure permissions, right-click on the project in SSMS and select Properties.
Go to the Permissions and click Browse to grant rights to a new role or SQL Server user that's in the catalog database called SSISDB.
By default, any user in the DBO role of the SSISDB database will automatically have full rights to your project unless you revoke those rights.

Permissions:

http://www.mssqltips.com/sqlservertip/3153/managing-ssis-security-with-database-roles/

Either install SSIS only or
Install SSIS & Data Engine instance (Preferred, SQL agent needed for IS job scheduling)

My First Integration Services Solution
https://code.msdn.microsoft.com/My-First-Integration-fa41c0b1

Reference: https://www.youtube.com/watch?v=3cPq9FXk-RA&index=1&list=PLNIs-AWhQzcmPg_uV2BZi_KRG4LKs6cRs

Control Flow --> is used to build and modify the control flow in the package, contains flow chat type

diagrams.

Data Flow -->

Five types of connection managers
Ado.net
Excel
flat file
ODBC
OLE DB
Raw file
Xml

Connection created in Project Connection managers can be used in any package with in the project
Connection created in one package cannot be shared with another package in the same project.

Debugging data flow tasks:
Using data viewers

Debugging control flows:
Setting breakpoints
Watching variable values

Difference between variable and parameter
Paramater can be passed at runtime, starts with $Package
Variable value is passed in SSIS cannot be changed in runtime, start with User


Deployment in SSIS
upto 2008 R2, For project deployment--> Click Convet to Package deployment model

Sunday, June 14, 2015

MSBI Questions


Differences Among SSIS 2005, 2008 and 2012

This article explains the basic differences among SSIS 2005, SSIS 2008 and SSIS 2012.
Basically, there are no differences between SSIS 2005 and SSIS 2008 at the architectural point of view, but there are additional features added in SSIS 2008.

Differences between SSIS 2005 and 2008

SSIS 2005 SSIS 2008
Script Task Here users can write the scripts in VB only. Here users can write the scripts in C# and VB.
DataProfilingTask DataProfilingTask is not in SSIS 2005. DataProfilingTask is introduced in SSIS 2008.
Cache Transformation Cache Transformation is not in SSIS 2005. Cache Transformation is introduced in SSIS 2008.
Look Up Transformation In SSIS-2005 for Error Output look-ups had only the following 3 options.
1.Fail Component
2. Ignore Failure
3. Re-direct row
SSIS -2008 added an additional feature “No match Out-Put” to the SSIS 2005.
Cache Mode Cache Mode is not in SSIS 2OO5. Cache Mode is introduced in SSIS 2OO8.
3-Different Cache Mode in SSIS 2008:
1.FULL CACHE MODE
2.PARTIAL CACHE MODE
3.NO CACHE MODE.
Cache Mode Cache Mode is not in SSIS 2OO5. Cache Mode is introduced in SSIS 2OO8.
3-Different Cache Mode in SSIS 2008:
1.FULL CACHE MODE
2.PARTIAL CACHE MODE
3.NO CACHE MODE.
OLEDB Provider for Analysis Services SSIS 2005 does not contains an OLEDB Provider for Analysis Services SSIS 2008 contains an OLEDB Provider for Analysis Services

Differences between SSIS 2008 and 2012

SSIS 2008 SSIS 2012
Undo And Redo No Undo And Redo feature in SSIS 2008 Undo And Redo feature available in SSIS 2012.
SSIS PARAMETERS SSIS Parameters at package level SSIS Parameters at the package level, task level and project level.
DQS TRANSFORMATION No DQS in SSIS 2008. DQS Transformation is available in SSIS 2012.
Change Data Capture (CDC) Introduced in SSIS 2008. But there is no task to support CDC in SSIS 2008. CDC ControlTask available to support CDC in SSIS 2012.
Data Flow TapNo Data Tap Available in SSIS 2008.Data Tap Available in SSIS 2012.

Summary

This article attemted to explain the basic SSIS differences in various versions of SQL .


What is the Control Flow?

  • When you start working with SSIS, you first create a package which is nothing but a collection of tasks or package components.  The control flow allows you to order the workflow, so you can ensure tasks/components get executed in the appropriate order.

What is the Data Flow Engine?

  • The Data Flow Engine, also called the SSIS pipeline engine, is responsible for managing the flow of data from the source to the destination and performing transformations (lookups, data cleansing etc.).  Data flow uses memory oriented architecture, called buffers, during the data flow and transformations which allows it to execute extremely fast. This means the SSIS pipeline engine pulls data from the source, stores it in buffers (in-memory), does the requested transformations in the buffers and writes to the destination. The benefit is that it provides the fastest transformation as it happens in memory and we don't need to stage the data for transformations in most cases.

Sunday, June 7, 2015

Install and configure Reporting Services 2014 for SharePoint 2013

SQL Server Reporting Services feature can be installed on SharePoint farm. In this article I will describe required steps to install and configure SQL Server Reporting Services 2014 on SharePoint 2013.
There are many combinations of SharePoint and Reporting Services version. Full table is available on MSDN site – Supported Combinations of SharePoint and Reporting Service and Add-in.
I will describe the latest version of SQL Server Reporting Services (2014) and SharePoint 2013.

Three main steps:
  1. Installing the Reporting Services in SharePoint integrated mode
  2. Installing the Reporting Services Add-In for SharePoint Products
  3. Create and configure SharePoint Service Application
Installing the Reporting Services in SharePoint integrated mode.
This installation must be made on every SharePoint Application server that will run Reporting Services Service Application in your farm.
  1. Mount SQL Server 2014 media and run setup. Choose Installation from the left menu.
  2. Launch a wizard by clicking New SQL Server stand-alone installation or add features to an existing installation.
    sqlrs_1
  3. Enter your product key and click Next.
  4. Accept license terms and click Next.
  5. If your server is connected to the Internet you can use Microsoft Updates to check for available updates. Click Next.
    sqlrs_2
  6. The Install Rules page validates system prerequisites. Check if there are any errors and fix them. Click Next.
    sqlrs_3
  7. Choose SQL Server Feature Installation from Setup Role page. Click Next.sqlrs_4
  8. Check Reporting Services – SharePoint, change feature directory if required. Click Next.
    sqlrs_5
  9. Review the Reporting Services ConfigurationInstall only option in Reporting Services SharePoint Integrated Mode must be selected.
    sqlrs_6
  10. Validate Feature Configuration Rules and fix any errors. Click Next.
  11. Review configurations and click Install.
  12. Click Close on the Complete page.
    sqlrs_7
Installing Reporting Service Add-Inn for SharePoint Products.
The second part of prerequisites is the Reporting Services Add-In. You can install it from SQL Server 2014 media disk or download it from Microsoft Download Center.
This installation must be made on every Front-End server in your farm.
Installation steps:
  1. Run rsSharePoint.msi file
  2. Click Next on Welcome page.
  3. Accept terms and click Next.
  4. Click Install.
Create and configure SharePoint Service Application
  1. Run SharePoint 2013 Management Shell and execute cmdlet Install-SPRSService to install the reporting service.
  2. Run Install-SPRSServiceProxy to install the service proxy.
  3. Go to Central Administration -> System Settings -> Manage services on server and start SQL Server Reporting Services Service, or run this PowershellGet-SPServiceInstance -All | where {$_.TypeName -like “SQL Server Reporting*”} | Start-SPServiceInstance
  4. Go to Central Administration -> Application Management -> Manage service applications and create the new SQL Server Reporting services Service Application.
    sqlrs_9
Now we can go and prepare our first report and deploy it to the SharePoint farm.

SQL Server 2014 Installation

In this tip, we will demonstrate the installation of SQL Server 2014 on a notebook. While processing large amounts of data on a system like this might not be feasible, one can still learn how to configure and use the features of SQL Server 2014.
Note: Before starting make sure you are connected to a network and have Internet access.
After launching the setup application, the following pop-up window might appear. It might appear several times throughout the installation process.
Quick Guide to Installing SQL Server 2014
The SQL Server Installation Center window will display. Along the left side of the window are the categories showing how the SQL Server Installation Center is organized. On the right side of the window are different actions the installer can take. Notice that some of the items allow the installer to view documentation while other items will make changes to the system. By the default the Planning category is displayed.
The SQL Server Installation Center window will display.
Clicking on Installation on the left side will display the different installation options. For this tip, we will click on "New SQL Server stand-alone installation or add features to an existing installation". This will launch the SQL Server 2014 Setup application.
Launch the SQL Server 2014 Setup application.
The SQL Server 2014 Setup application lists the steps it will follow on the left side of the window. Enter the product key and click "Next >".
The SQL Server 2014 Setup application lists the steps it will follow on the left wide of the window.
Review the license terms, click on "I accept the license terms", and then click "Next >".
click on "I accept the license terms"
The SQL Server 2014 Setup application will run multiple checks for rules during the installation process. If a rule check fails, the setup application will provide the corrective measures to take so installation may proceed. The setup application will also search for product updates.
The SQL Server 2014 Setup application will run multiple checks for rules during the installation process.
The setup application will download, extract and install files needed to carry out the installation process. Click on "Next >" to continue.
The setup application will download, extract and install files needed to carry out the installation process.
Another rule check will be run to ensure everything is in place so the setup will be successful. If a rule check fails, the setup application will provide the corrective measures to take so installation may proceed. Click on "Next >" to continue.
f a rule check fails, the setup application will provide the corrective measures
On the Setup Role screen, we will click on the SQL Server Feature Installation radio button. This will allow us to install the database engine, Analysis Services, Reporting Services, Integration Services and other features of SQL Server 2014. Click on "Next >" to continue.
click on the SQL Server Feature Installation radio button.
The next step is the feature selection. This allows the installer to pick and choose the features to be installed. On the right side of the window, the disk space requirements are displayed. At the bottom, the installer can choose the path for the instance root and shared feature directories. Click on "Next >" to continue.
On the right side of the window, the disk space requirements are displayed.
Sometimes a "Please Wait..." pop-up box might appear.
"Please Wait..."
The Instance Configuration screen allows the installer to specify the name of the instance and its ID. This screen will also display other installed instances.
The Instance Configuration screen allows the installer to specify the name of the instance and its ID.
The Server Configuration screen shows the services to be installed, the service account name and the Startup Type. If you are installing SQL Server 2014 on a device with limited resources then the Startup Type should be set to Automatic (Delayed Start). Click on "Next >".
The Server Configuration screen shows the services to be installed
On the Server Configuration tab of the Database Engine Configuration screen, select your preferred Authentication Mode and specify your SQL Server administrators.
On the Server Configuration tab of the Database Engine Configuration screen
On the Data Directories tab of the Database Engine Configuration screen, specify your preferred directories for the data root, system database, user database, user database log, temp database, temp database log, and backup. Click on "Next >".
the Database Engine Configuration screen
On the Server Configuration tab of the Analysis Services Configuration screen, select your preferred Server Mode and specify your Analysis Services administrators.
the Server Configuration tab of the Analysis Services Configuration screen
On the Data Directories tab of the Analysis Services Configuration screen, specify your preferred directories. Click on "Next >".
the Data Directories tab of the Analysis Services Configuration screen
On the Reporting Services Configuration, select Install and configure. Click on "Next >" to continue.
Reporting Services Configuration
The Ready to Install screen displays all of the features and prerequisites to be installed. At this point, the installer can still go back to make changes or quit the process. Click on "Install" to begin the installation of the SQL Server 2014 components.
Click on "Install" to begin the installation of the SQL Server 2014 components.
The installation progress bar tracks the status of the installation.
Upon completion of the installation, click on "Close" to exit the SQL Server 2014 Setup.
The SQL Server Installation Center can now be closed.

SQL Server 2012 Installation

Microsoft SQL Server databases are used by over 68% of sites that use one or more database technologies. Surpassed by only Oracle databases, it means most DB admins will have to install or manage SQL servers at one point or another.
In this article, I’ll walk you through the installation of an SQL Server 2012.

How to Install the SQL Server 2012

Setting up the SQL Server is pretty straightforward. Follow these steps:
First, on MTLSQL01, open a session as an Administrator. Add the OMAdmins Group or any other group/user that will be used for this installation in the Administrators Local group of the MTLSQL01 Server and then close the session.
Note: The server name is an example. You can use whatever name fits your needs.
admin_properties
Open a new session with the OMAdmin user. Click Setup and then Installation. Then click the New SQL Server stand-alone… and Show Details.
sql_server_2012_setup
Validate that the status for all rules displays Passed. Click OK once it’s done.
setup_support_rules
Select Specify a free edition if you have an evaluation version or Enter the product key if you have a serial number. After entering your serial number (or picking the free edition), click Next.
product_key
Select I accept the Licence terms. Also, if you want to send usage data to Microsoft, you can click that box too. Click Next to get to the Server Setup Update screen. If you want to install updates, click the Include SQL Server Setup Update and click Next. The update will download and install. Once it’s done, click Show Details and validate that the status for all rules displays Passed.
setup_support_rules2
Once you’re done with the update installation, continue to the Setup Role screen. Select SQL Server Feature Installation and continue.
This server will be used only by the Operations Manager Database (the short time database). The SQL Reporting Service will be installed on another server.
Select Database Engine Services and Full-Text and Semantic Extractions for Search (the latter is not mandatory). Change the path from C: to D: or any other disk.
feature_selection
Select Management Tools Basic and Management Tools – Complete. This will install all tools needed to manage the SQL Server. You can then continue to the next screen. Once again, check the Show Details to validate that the status for all rules displays Passed.
feature_selection2
Select the Named Instance option and type OpsMgrOM. If you want, you can also install SQL without an instance. Once again, change the path from C: to D: and continue to the next screen. In the Disk Space Requirements screen, just click Next.
instance_configuration
Select a domain user for both the SQL Service Agent and the SQL Server Database Engine. This user is a Domain User and doesn’t have any admin rights on the SQL Server. The Startup type must be Automatic. Then click on the Collation tab.
server_configuration
At this point, you can choose the default collation (SQL_Latin1_General_CP1_Cl_AS) or choose another supported collation. Click Next.
Note: The collation cannot be changed after the SQL installation. It is very important to select the collation that is supported.
server_config2
Now, select Windows authentication mode. Click Add and select the OMAdmins group. Click Next. All user from this group will be a SQL SysAdmin.
database_engine_config
Click Next on the Error Reporting screen and then Show Details. Once again, validate that the status for all rules displays Passed. Then, click Next.
installation_config_rules
Click Install to begin the SQL Server 2012 installation. Validate that the status for all rules displays Passed a final time and click Close. The installation is complete.
ready_to_install

Validate that you can open SQL

We will now validate that you can open the SQL database. On MTLSQL01 server, make sure your session is open with a user member of the OMAdmin group. Press the Windows Key and select SQL Server Management Studio.
Select MTLSQL01\OPSMGROM and click Connect. This is your SQL instance that you define during installation. If you did not define any instance, just select the server name.
sql_connect_server
Expand the Server tree and then the Databases. Validate that the 4 databases are created and mounted.
SQL_object_explorer
Note: Install the last Service Pack and Cumulative Roll Up for SQL 2012.
Your SQL Server 2012 is now correctly installed.

Installing SQL 2012 Server for Reporting Server

This installation is similar to SQL Server installation: you select the same options you did for the SQL Server, and then select the reporting service. Once the service is installed, you’ll configure it.
Open a session with Administrator on MTLRS01 Server (or whatever name you’ve given to your server) and add the OMAdmins group in the Administrators local group of the server. You can also add any other groups or user that you would like to give admin rights to.
Administrators Properties - OMAdmins
Close the session and open a new one with the OMAdmin user or any user that is an administrator of the reporting server. Click Setup and Installation. Once you’re in the SQL Server Installation Center, click New SQL Server stand-alone installation or add…
New SQL Server stand-alone installation
In Setup Support Rules, click Show Details. Validate that all statuses are passed and click OK.
Setup Support Rules - show details
If you have an evaluation or a serial number, select Specify a free edition, then select Evaluation or Serial Number. Then select Enter the product key, type your product key and click Next. Select I accept the licence terms. If you want to send usage data to Microsoft, also select Send feature usage data to Microsoft and click Next.
Product Key
If you want to install the product update, select Include SQL Server Setup Update. The update will automatically download and install. Again, click Show Details to ensure that all statuses are passed before you click Next.
Product Updates
In the Setup Role section, select SQL Server Feature Installation and click Next.
This server will be used only by the Operations Manager Reporting Database (data warehouse) and is the long-term database. Select the following: Database Engine Services, Full-Text and Extraction…, Reporting Services – Native, Management Tools Basic and Management Tools – Basic. This will install all the tools required to manage the SQL Server. Replace the C: path by D: or any other disks and click Next.
Feature Selection
Click Show Details and validate all statuses are passed before you click Next.
 Installation Rules
In the Instance Configuration section, enter OpsMgrRS in the Name instance field. You can also install SQL without any instance. Change the Path to D: and click Next. You’ll then access the Disk Space Requirements window. Click Next.
Instance Configuraion
For both SQL Service Agent and SQL Server Database Engine, select SRVCSQL user. This is only a domain user and it has no Administrators right on the SQL Server. Make sure to set the Startup Type to Automatic for both services. For the SQL Reporting Services, select OMDWR user. Then select the Collation tab.
Server Configuration
You can use the default which is SQL_Latin1_General_CP1_CI_AS, or choose another supported collation. Then click Next.
Note: The Collation cannot be changed after SQL installation: it‘s very important to select the collation that is supported.
In the Database Engine Configuration window, select Windows Authentication Mode click Add and select the OMAdmins group or admin user needed to install the reporting server. Click Next.
Database Engine Configuration
In Reporting Services Configuration, select Install Only and click Next. Click Next Again in Error Reporting until you get to the Installation Configuration Rules. Then select Show details. Once you’ve ensured that all statuses are passed, click Next.
Installation Configuration Rules
When you get to the Ready to Install section, click Install and wait until all statuses read Succeeded before you click Close.
SQL Server Completion

Validate that SQL is working

On MTLRS01 server, your session is open with OMAdmin user. Press the Windows Key and select SQL Server Management Studio.  Then select Server Name MTLSQL01\OPSMGRRS and click Connect.
Pop-up window - Connect to server
Once you are connected, expand the Server, Databases and System Database. Then validate that the 4 databases are created and mounted. The SQL Reporting Server Database are not created yet.
Expand Server, Databases and System Database

Configuring SQL reporting Services

In this section, we’ll configure and create the SQL reporting Service Database, which will be used to save all OpsMgr Reports.
On MTLRS01 Server, your session is open with OMAdmin user or any other user you used to install the Reporting Server. Press the Windows Key and select Reporting Services. If the Reporting Services is not there, ensure you pin it to the Start menu.
Start menu
Connect to the server and click Service Account. Validate that the current domain user is an administrator of the Reporting Server.. Click Web Service URL to accept the default URL and click Apply. Then validate that the URL was created and click Database and Change Database.
Web Source URL
Select the Create a new report Database and click Next. Double-check the Server Name field corresponds to MTLRS01 \OpsMgrRS and click Test Connection. You will get the confirmation message Test Connection Succeeded to confirm the connection is working properly. Click OK.
Report Database Configuration Wizard
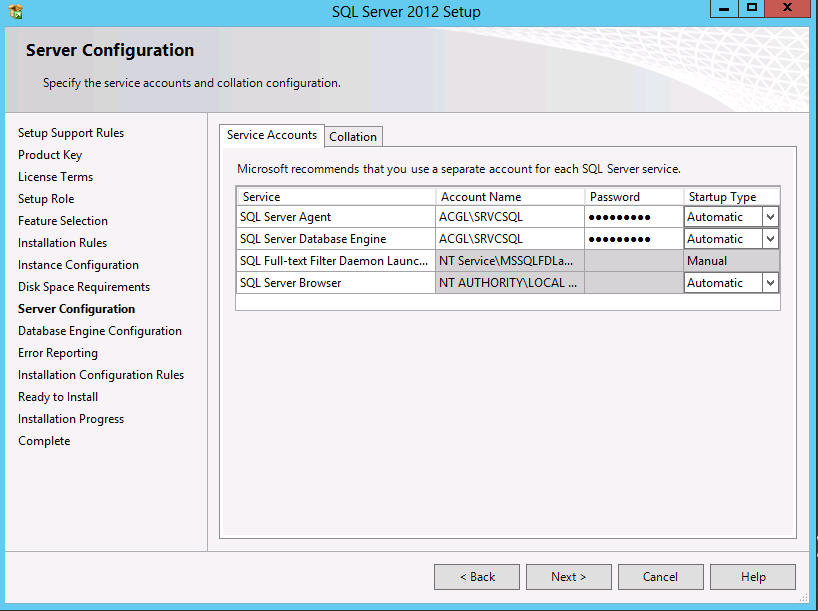
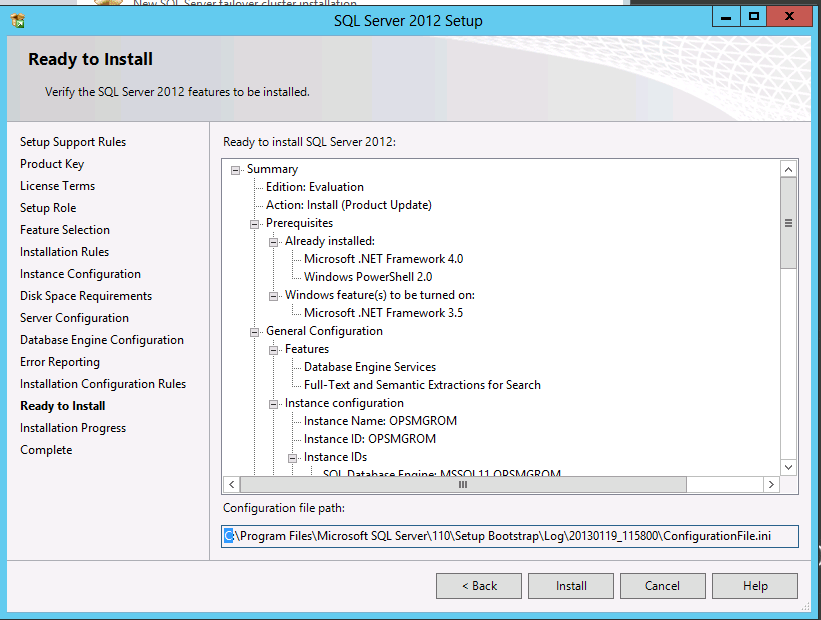
Double-check that the Server Name still reads: MTLRS01\OpsMgrRS and click Next. Accept the Default and click Next. Click Next again and you will access the Summary window. Validate that everything is OK and click Next.
Summary
In the Progress and Finish window, ensure that all statuses are Success before you click Finish. Select Report Manager URL and accept the default by clicking Apply.
Report Manager URL
To validate that the URL was created, double-click on the URL: http://MTLRS01:80/Reports OPSMGRRS01.
SQL Reporting Services - Home
The SQL Server Reporting Services Home will open. Return to Web Service URL and click on URL http://MTLRS01:80/ReportServer_OPSMGRRS. The Microsoft SQL Server Reporting Services will open, validating that the SQL Reporting Services is working.
Web Service URL
In the Encryption Keys section, click Backup. In the pop-up window, type in the File Location of the Encryption Key: C:\Sources\RS Encrypted. Enter a password and confirm it. Ensure that this file is taken by your backup and click OK
Backup Encryption Key
Start by opening SQL Server 2012 Management Studio, and ensure that the server name and the instance are there. Here it’s MTLRS01\OpsMgrRS.
Connect to server - Pop-up window
Expand MTLRS01 and expand Databases. Validate that both ReportServer and ReportServerTempDB databases were created as we can see below. Install the Last Service pack and Cumulative roll up for SQL 2012 before you install OpsMgr 2012.
Expand MTLRS01 and Databases
Congrats, your SQL Reporting Server is now installed!